I recently posted a video with an introduction to Behavior Trees. My first draft was almost 40 minutes long, so I decided to cut it and simplify a few parts.
I managed to make it 10 minutes long, but to be honest I'm not satisfied with how it turned. Here in this post, I'll try to summarise the topics covered in the video and hopefully, they will be clearer and easier to understand.
What are Behavior Trees
Behavior Tree is a common pattern used on game AIs. It makes it possible to create complex behaviors by using smaller, independent tasks.
To understand how Behavior Trees work, we need to talk about the different elements that compose a Behavior Tree.
For my examples, I'll be using GDScript, the default language in Godot. It was inspired by Python, but even if you are not familiar with it, having a basic programming knowledge is enough to understand the examples.
Behavior Tree nodes
With exception of the root node, nodes in a behavior tree have a common contract. A node may return one of the following states: running if its execution has not finished in the current call, success if it has achieved its goal, or failure otherwise.
In my implementation, nodes also have a tick method. This method is called by the node's parent and receives two arguments: an actor, which is the element which the behavior is applied to, and a blackboard, which is a type of dictionary where data may be stored for later use.
Behavior Tree's implementation and naming may change wildly, but I will stick with a simple implementation, to make things easier to understand.
# task node pseudo implementation
func tick(actor, blackboard):
  if actor.attack(blackboard.get("target")):
    return SUCCESS
  return FAILURE
The root node
The root node is responsible for controlling the execution of the behavior tree. It has only one child and calls it with a certain frequency.
Here is an example of implementation for a root node:
# root node example
onready var blackboard = Blackboard.new()
onready var child = self.get_child(0)
onready var actor = get_parent()

func _process(delta):
  blackboard.set("delta", delta)
  child.tick(actor, blackboard)
Let me clarify a few details from the example above.
If you are used to game development, you already know about something called the game loop. Most game engines expose a function which is called on each loop, so you can implement your game logic in it. Godot calls it _process, (there is also a _physics_process method, but this is not important for this subject). As my root node uses the _process function, it guarantees that the tree will be executed once every loop.
This function receives an argument, called delta. This is the time elapsed since the last time this function was executed. This is useful for calculations in general. For convenience, I'm adding the delta value to the blackboard, so other nodes can use it if needed.
This implementation also assumes that the Behavior Tree is a child of the actor, as you can see on line 4.
Finally, on line 8, it calls its child, passing the actor and the blackboard.
Control Flow nodes (composites)
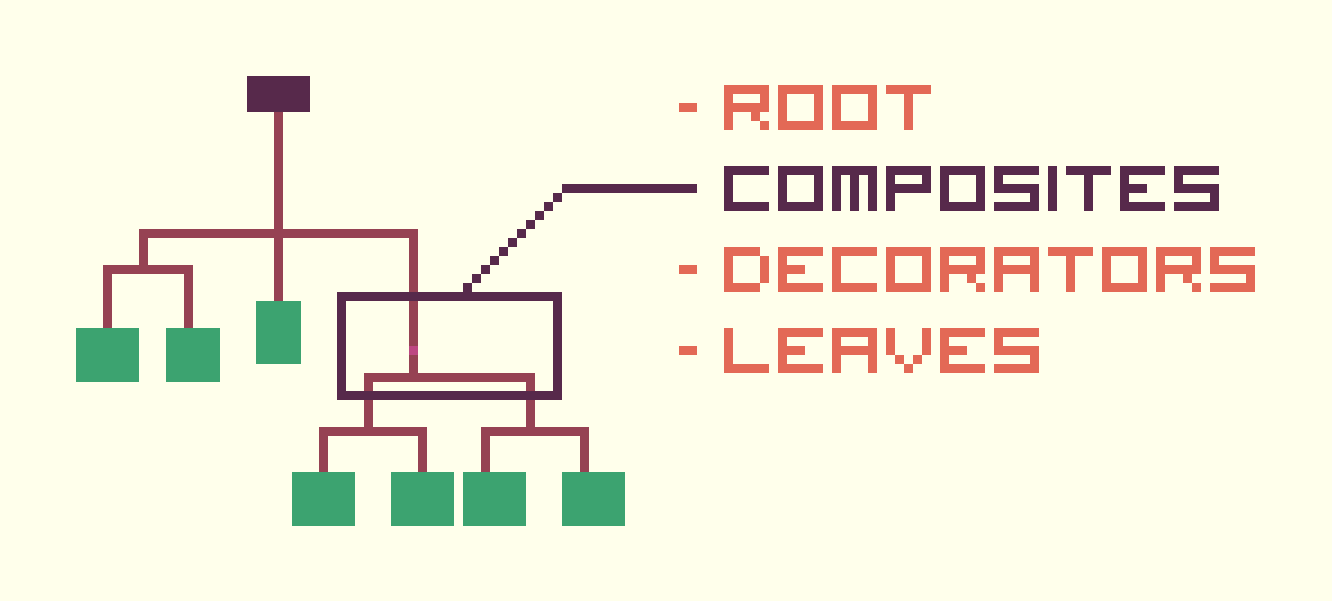
Control flow nodes are the branches of the tree. They are used to control which tasks should be executed. The two most common implementations are sequences and selectors.
A sequence executes its children one by one, in order. In case one of its children returns failure or running, it stops the execution and returns the same status. If all of its children succeed, it returns success.
# sequence composite example
func tick(actor, blackboard):
  for c in get_children():
    var response = c.tick(actor, blackboard)
    if response != SUCCESS:
      return response

  return SUCCESS
A selector also executes its children one by one, in order. However, it stops when one of its children returns success or running. In case a child returns failure, it tries the next one. Only when all children return failure, it will fail.
# selector composite example
func tick(actor, blackboard):
  for c in get_children():
    var response = c.tick(actor, blackboard)
    if response != FAILURE:
      return response

  return FAILURE
Execution nodes (leaf nodes)
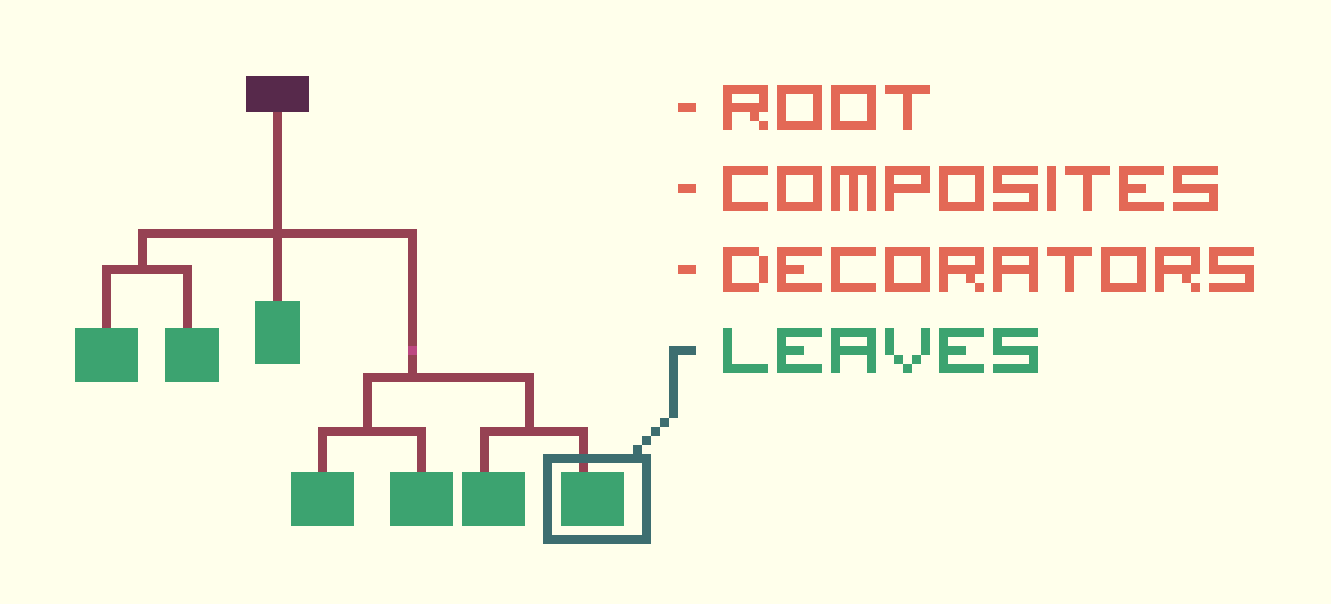
Execution nodes are where your custom logic is implemented. They are also called leaf nodes because they are located on the edges of the tree. In other words, leaf nodes do not have child nodes.
Your leaf node could implement an action, such as "attack", "move" and "jump", or a condition, such as "has low health", "is enemy" or "is in attack range".
# leaf node example: go to position
func tick(actor, blackboard):
  var target_position = blackboard.get("target_position")
  var delta = blackboard.get("delta")
  actor.move_towards_position(target_position, delta)

  if actor.position.distance_to(target_position) > 0:
    return RUNNING
  return SUCCESS
The example above implements an action to move the actor to a predefined position. The movement implementation is abstracted in the method move_towards_position. Assume this method does some kind of linear interpolation.
Because this kind of action is usually not finished in only one tick, we check if the actor has reached the target and, in case it has not, we return running, otherwise we return success.
Decorators
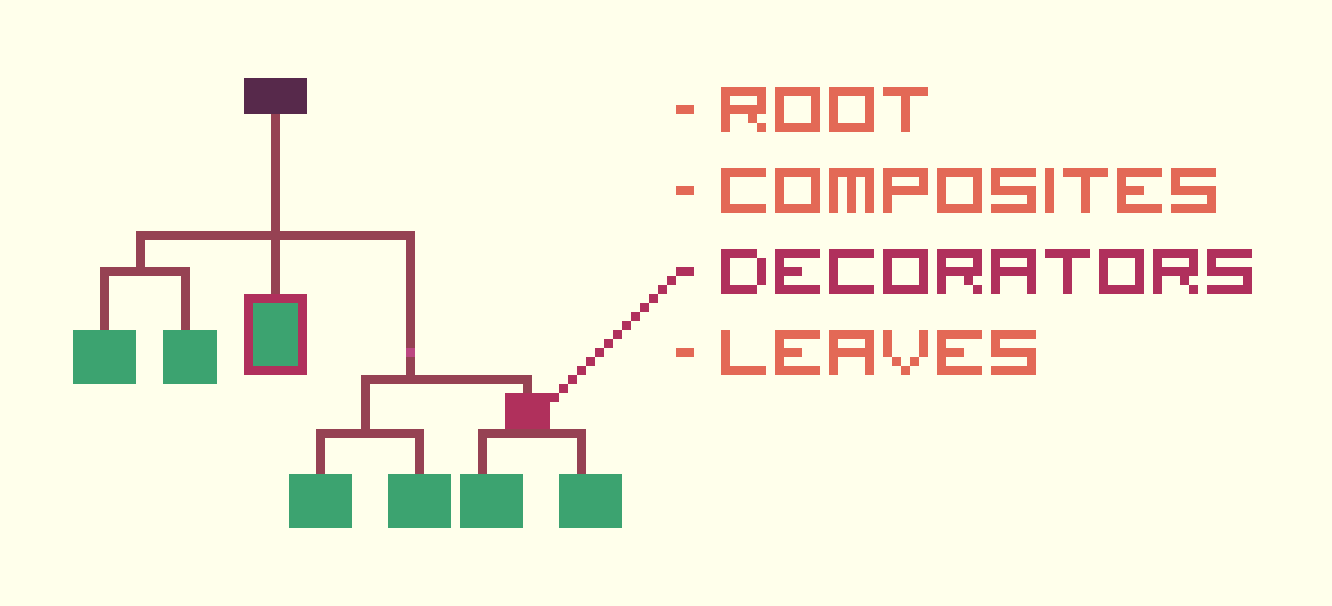
The decorator pattern is a common design pattern in object-oriented programming. It allows behavior to be added to objects dynamically, without changing their class. Decorator nodes do the same thing for nodes. They may add extra checks before executing a node or changing its output after execution. Let me show you examples for these two cases.
Example 1: changing the output
The inverter decorator inverts the output of its child. This way success becomes failure, and failure becomes success. This makes nodes more reusable.
Imagine a situation where you have an enemy with an attack cooldown period. It attacks the player if not in cooldown, and when in cooldown, it runs away. Instead of implementing two different scripts for the leaf nodes, "is in cooldown" and "is not in cooldown", you can use the same script, only adding an inverter decorator to the condition when needed.
# Inverter decorator
func tick(action, blackboard):
  var child = self.get_child(0)
  var response = child.tick(action, blackboard)

  if response == SUCCESS:
    return FAILURE
  if response == FAILURE:
    return SUCCESS

  return RUNNING
Example 2: adding input behavior
A limiter decorator adds a limit on how many times a node can be called. It keeps track of how many times the node was executed, and in case the predefined limit is reached, it stops passing calls to the child node, and returns failure on every subsequent call.
Let's say you are implementing a fighting game. In this game there is a character with an over-powered attack, that should be executed at most once in a fight. For that, you could add a limiter decorator to the branch that deals with the over-powered attack logic. This way, even if the tree calls this branch multiple times, it will only succeed once.
onready var cache_key = 'limiter_%s' % self.get_instance_id()
export (float) var max_count = 0

func tick(actor, blackboard):
  var current_count = blackboard.get(cache_key)

  if current_count == null:
    current_count = 0

  if current_count <= max_count:
    blackboard.set(cache_key, current_count + 1)
    return self.get_child(0).tick(actor, blackboard)
  else:
    return FAILED
In my example, for convenience, I'm saving the execution count in the blackboard. Another thing to note, is that max_count is defined through a parameter, 0 is its default value.
Behavior Trees in Godot
Most game engines have some built-in or community developed Behavior Tree implementation. Godot has at least one community developed one, that I know, with a drag-and-drop interface. I haven't used it myself, so I can't really recommend it.
Godot's architecture was built around the concept of a tree of "nodes", which makes it easy to create Behavior Trees without requiring any extra plugin.
Here is an example of tree using Godot nodes (these node icons are custom images I added to the project).

And here is an example showing how easy is to change node's parameters through Godot's editor.
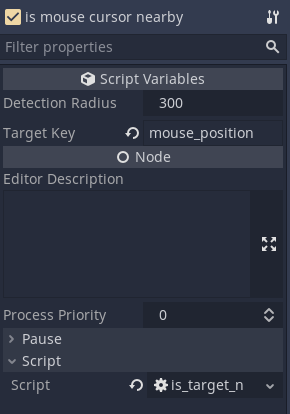
I created this example to show how to implement a Behavior Tree in Godot. In my example, there is a behavior tree for an actor that follows the mouse, when close enough, and in case the mouse is too far, it goes to the closest "home". As a third branch, the actor changes its colour when reaches home for the first time.
In case you are interested in the step-by-step implementation, check the video in the beginning of this blog post.
Tips
If you decide to implement a behavior tree yourself, there are a few tips you may want to follow:
1 - Do not keep state inside your nodes
Keeping state inside nodes makes them less reusable. Always keep in mind other nodes may want to use the info stored. Also, you can't guarantee a node will be called on every tick, so internal data could get stale.
If you need to save or share data, save it in the blackboard.
2 - Do not hardcode blackboard keys in your scripts.
In this post, most of my examples have blackboard keys embbeded in the script, like the "go to position" action:
func tick(actor, blackboard):
  var target_position = blackboard.get("target_position")
  var delta = blackboard.get("delta")
  actor.move_towards_position(target_position, delta)
  if actor.position.distance_to(target_position) > 0:
    return RUNNING
  return SUCCESS
This is not a good idea, as it means you will only be able to use this node with data from "target_position", and, in some situations, you may have issues where different nodes overwrite the same blackboard key.
Instead, you should export your key as a parameter, like this:
export (String) var target_key

func tick(actor, blackboard):
  var target_position = blackboard.get(target_key)
  var delta = blackboard.get("delta")
  actor.move_towards_position(target_position, delta)
  if actor.position.distance_to(target_position) > 0:
    return RUNNING
  return SUCCESS
3 - Abstract implementation details from your actions
For instance, even though your action may say "go to position", it doesn't need to know how your actor moves around.
Your actor may choose to implement movement like this:
position += position.direction_to(target_position) * delta
Or maybe this way:
self.position = Vector2(
  lerp(self.position.x, target_position.x, delta),
  lerp(self.position.y, target_position.y, delta)
)
Either way, this should be abstracted into a method, and the action node should use the high-level method, instead of re-implementing it itself. This makes your "go to position" node more reusable, as it can be used by different actors, only requiring them to expose an implementation for the high-level method.
As an improvement, you could use types in your implementation. This way, you make sure your actor implements the methods required by your action.
func tick(actor: Character, blackboard: Blackboard):
  # ...
4 - Your leaf node should have a single responsibility
Using an example from the video, you could implement an action "follow mouse cursor". This action would:
- get the mouse position
- check if the mouse is close to the NPC
- move NPC towards mouse position
This node is very specific, making it less reusable and harder to change. What if I want to add a maximum time for how long the NPC should follow the mouse? Or what if I decide to implement some kind of cooldown period?
Any change would require making this node even more complex. To prevent that, you should have small nodes with clear responsibilities.
Each bullet point in that list could be a node by itself. In fact, this is the end result in my example.
5 - Start simple
Even though smaller, generic nodes are more reusable, it's harder to start like this.
It's easier to start with a very specific implementation, and then generalise it when more scenarios appear, and you can see the similarities.
This is actually a piece of advice also applied to general programming, known as Rule of three.
6 - Not everything goes in your behavior tree
As I mentioned before, you should abstract details about your actor from your behavior tree. There are many things you don't need to have explicit in your behavior tree.
As an example, if when moving to position you want to play a "walking animation", this should be made internally in your actor, and not like a node "play animation".
7 - Feel free to refactor your tree
In my example, I ended with a tree, like this:

But maybe this tree could be better represented like this:
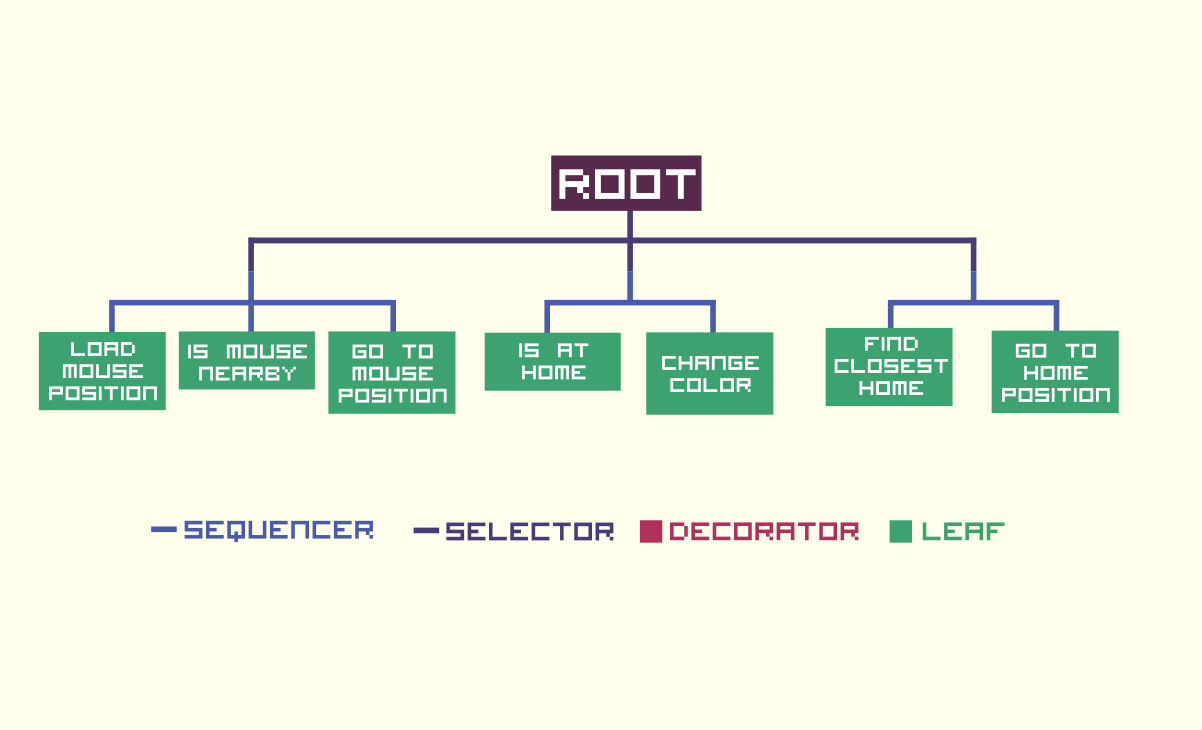
Both trees achieve the same result, but they do it in different ways. Feel free to move nodes around if it makes your tree clearer.
8 - Make your tree descriptive
It's good to give your nodes descriptive names, even though you may be using generic scripts. This makes it easier to understand what your behavior tree is doing.
A tree path:
sequence > load mouse position > is target nearby > go to position
is harder to understand than:
sequence: follow mouse > load mouse position > is mouse cursor nearby > go to the current mouse position.
Conclusion
I hope this text may have helped you understand a little bit more about behavior trees. Even if you decide to use an off-the-shelf solution, it's important to understand how it works under the hood.
As I said before, this is a very naive and simple implementation. There are probably more robust and performant implementations out there.
Having said that, this is how I implement behavior trees in my game, and it has worked well so far.
You can download and fork my example from github.
If you like game devlogs, you may consider subscribing to my Youtube channel.
Thanks for reading. Comments, suggestions and feedback are always welcome.
See you! Stay safe!